Core Data in IOS (for Beginners)
Introduction
Core Data is a schema-driven object graph management and persistence framework.
Fundamentally, Core Data helps you to save model objects (in the sense of the model-view-controller design pattern) to a file and get them back again.

Core Data is available on iOS 3.0 and later.


 Click the plus Sign to add Attribute


Core Data is a schema-driven object graph management and persistence framework.
Fundamentally, Core Data helps you to save model objects (in the sense of the model-view-controller design pattern) to a file and get them back again.

Core Data is available on iOS 3.0 and later.
--------------------------------------------------------------------------------------
What i am going to do is...

Step 1
Create a ARC Project ....

 |
| Click the ARC also |
Step 2
Click the "CoreDataTute.xdatamodeled"

Click Add Entity icon and type Student(Table name)


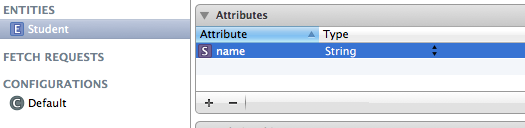
Step 3
click this icon to see the table

Step 4
Add new class for your Project


Step 5
Type this code in your .h class (which you add new class in above)
#import
<UIKit/UIKit.h>
@interface
InsertDataViewController : UIViewController
{
IBOutlet
UITextField
*nameField;
}
-(IBAction)save;
-(IBAction)Fetch;
@end
----------------------------------------------------------------
Step 6
Type this code in your .m class (which you add new class in above)
Import the "AppDelegate.h" .m class to your class
-----------------------------------------------------------------------------------------------------------------------
#import
"InsertDataViewController.h"
#import
"AppDelegate.h"
@interface
InsertDataViewController
()
@end
@implementation
InsertDataViewController
-
(id)initWithNibName:(NSString
*)nibNameOrNil bundle:(NSBundle
*)nibBundleOrNil
{
self
= [super
initWithNibName:nibNameOrNil
bundle:nibBundleOrNil];
if
(self)
{
//
Custom initialization
}
return
self;
}
-
(void)viewDidLoad
{
[super
viewDidLoad];
//
Do any additional setup after loading the view from its nib.
}
-(IBAction)save{
AppDelegate
*appDelegate=(AppDelegate
*)[[UIApplication
sharedApplication]delegate];
//Entity
for table name : Team
NSEntityDescription
*entity=[NSEntityDescription
insertNewObjectForEntityForName:@"Student"
inManagedObjectContext:appDelegate.managedObjectContext];
//set value for the column name
[entity
setValue:nameField.text
forKey:@"name"];
NSError
*error;
//its returns true when values inserted in database succesfuly otherwise false
BOOL
isSaved= [appDelegate.managedObjectContext
save:&error];
NSLog(@"Successfully
Saved : flags @%d",isSaved);
}
-(IBAction)Fetch{
AppDelegate
*appDelegate=(AppDelegate
*)[[UIApplication
sharedApplication]delegate];
//create
Entity object for Table : Student
NSEntityDescription
*entity=[NSEntityDescription
entityForName:@"Student"
inManagedObjectContext:appDelegate.managedObjectContext];
//create
fetch request
NSFetchRequest
*fetchRqst=[[NSFetchRequest
alloc]init];
[fetchRqst
setEntity:entity];
//Get
all rows in mutable array
NSMutableArray
*array=[[appDelegate.managedObjectContext
executeFetchRequest:fetchRqst
error:nil]mutableCopy];
//Core
data return each row as managed object so we can access rows values
through key value pair
for(NSManagedObject
*obj in
array)
{
NSLog(@"SLIIT Student Names:
%@\n",[obj
valueForKey:@"name"]);
}
}
-
(void)didReceiveMemoryWarning
{
[super
didReceiveMemoryWarning];
//
Dispose of any resources that can be recreated.
}
@end
-----------------------------------------------------------------------------------
Step 7
Design the following Ui and Connect those Method like this.....


Step 8
go to the AppDelegate.m class and set Above viewController(in my case it is InsertDataViewController) as a Root View Controller
to do that import view controller Header file to the AppDelegate.h class
and change the code of
"- (BOOL)application:(UIApplication *)application didFinishLaunchingWithOptions:(NSDictionary *)launchOptions" method in AppDelegate.h
#import
"InsertDataViewController.h"
-
(BOOL)application:(UIApplication
*)application didFinishLaunchingWithOptions:(NSDictionary
*)launchOptions
{
self.window
= [[[UIWindow
alloc]
initWithFrame:[[UIScreen
mainScreen]
bounds]]
autorelease];
//
Override point for customization after application launch.
InsertDataViewController
*rootViewController=
[[InsertDataViewController
alloc]
initWithNibName:@"InsertDataViewController"
bundle:nil];
[self.window
setRootViewController:rootViewController];
self.window.backgroundColor
= [UIColor
whiteColor];
[self.window
makeKeyAndVisible];
return
YES;
}
--------------------------------------------------------------------------------------------------------------
Step 9
Run Your App & insert some data and Click the fetch button ....

- After click Save Button

this mean your successfully added .................!
- After Click Fetch Button

Good Luck!
Tutorial List
- SQLite Based iPhone Application
- json with IOS (Basic) - Tutorial
- Simple Table View in IOS
- Load Distinct Images from array into UITableView
- Simple UIPickerView Example
- Tab Bar Application Part 1
- Tab Bar Application Part 2
- Tab Bar Application Part 3 ( with Login Screen )
- Tab Bar Application Part 4 ( Navigation )
- Table View Design in IOS Part 1
- Table View Design in IOS Part 2 ( Time Table )
- How to Add search bar in Table View
- Local Notification in IOS
- Core Data (For Beginners )
- Core Data Tute 2 (Add/Delete/Search)
- Core Data Tute 3 (Two table)
- Custom Cell in UITableview
- Lazy Loading
- Pull to Refresh in TableView
- Working with keyboard in Objective C - Part 1