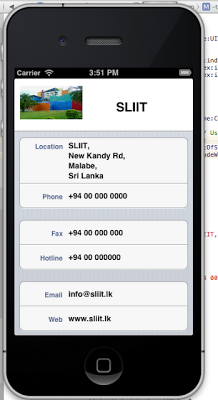
Table View Design in IOS Part 1
what I am going to do is.....
Step 1
create a project in xcode
Step2
click the ".xib"
add tableview
reduce the height of the tableView like this..
add a View and edit like this.........
add image view & label like this

Step 3
click the ".m " file & change code like this......
#import "ViewController.h"
@interface ViewController ()
@end
@implementation ViewController
NSMutableArray *listOfMovies;
NSArray *contentArray;
NSArray *contentArray2;
NSArray *contentArray3;
- (void)viewDidLoad
{
[super viewDidLoad];
// Do any
additional setup after loading the view, typically from a nib.
}
- (void)didReceiveMemoryWarning
{
[super didReceiveMemoryWarning];
// Dispose
of any resources that can be recreated.
}
- (NSInteger)numberOfSectionsInTableView:(UITableView *)tableView {
return 3;
}
- (NSString *)tableView:(UITableView *)tableView titleForHeaderInSection:(NSInteger)section {
NSString
*sectionHeader = nil;
if(section == 0) {
//sectionHeader
= @"";
}
if(section == 1) {
//sectionHeader
= @"";
}
if(section == 2) {
//sectionHeader
= @"";
}
return
sectionHeader;
}
- (NSInteger)tableView:(UITableView *)tableView numberOfRowsInSection:(NSInteger)section {
if(section == 0) {
contentArray = [[NSArray arrayWithObjects:@"Location",@"Phone", nil] retain];
return [contentArray count];
}
if(section == 1) {
contentArray3 = [[NSArray arrayWithObjects:@"Fax", @"Hotline", nil] retain];
return [contentArray3 count];
}
if(section == 2) {
contentArray2 = [[NSArray arrayWithObjects:@"Email", @"Web", nil] retain];
return [contentArray2 count];
}
return 0;
}
//--set the number of row in the table
- (UITableViewCell *)tableView:(UITableView *)tableView
cellForRowAtIndexPath:(NSIndexPath *)indexPath {
static NSString
*CellIdentifier = @"Cell";
UITableViewCell *cell =
[tableView dequeueReusableCellWithIdentifier:CellIdentifier];
if(cell == nil)
{
cell = [[[UITableViewCell alloc] initWithStyle:UITableViewCellStyleValue2 reuseIdentifier:CellIdentifier]
autorelease];
}
NSString *cellValue =
[contentArray objectAtIndex:indexPath.row];
NSString *cellValue2 =
[contentArray3 objectAtIndex:indexPath.row];
NSString *cellValue3 =
[contentArray2 objectAtIndex:indexPath.row];
//
cell.textLabel.text = cellValue;
//-----------------
UILabel *cellLabel =
[[UILabel alloc] initWithFrame:CGRectMake(0, 0, cell.frame.size.width, cell.frame.size.height)];
cellLabel.backgroundColor = [UIColor clearColor];
cellLabel.font=[UIFont systemFontOfSize:12.0]; // Use 16 if you want something more
standard
cellLabel.lineBreakMode = UILineBreakModeWordWrap;
cell.detailTextLabel.font = [UIFont boldSystemFontOfSize:14.0];
cell.detailTextLabel.lineBreakMode = UILineBreakModeWordWrap;
cell.detailTextLabel.numberOfLines=4;
[cell addSubview:cellLabel];
switch (indexPath.section) {
case 0:
switch (indexPath.row) {
case 0:
cell.textLabel.text=cellValue;
cell.detailTextLabel.text = @"
SLIIT,\n New Kandy Rd, \n Malabe, \n Sri Lanka"; //address
break;
case 1:
cell.textLabel.text=cellValue;
cell.detailTextLabel.text = @" +94 00 000 0000";//phone no
break;
default:
break;
}
break;
///-----+61
93198111
case 1:
switch (indexPath.row) {
case 0:
cell.textLabel.text=cellValue2;
cell.detailTextLabel.text = @" ++94 00 000 000";//hotline
break;
case 1:
cell.textLabel.text=cellValue2;
cell.detailTextLabel.text = @" +94 00 0000000";//fax
default:
break;
}
break;
///---
case 2:
switch (indexPath.row) {
case 0:
cell.textLabel.text=cellValue3;
cell.detailTextLabel.text = @"
info@sliit.lk";
break;
case 1:
cell.textLabel.text=cellValue3;
cell.detailTextLabel.text = @"
www.sliit.lk";
default:
break;
}
break;
}
[cellLabel release];
return cell;
}
- (CGFloat) tableView:(UITableView *)aTableView
heightForRowAtIndexPath:(NSIndexPath *)indexPath {
switch (indexPath.section) {
case 0:
switch (indexPath.row) {
case 0:
return (44.0 + (3 - 1) * 19.0);
break;
case 1:
break;
default:
break;
}
break;
}
return 44.0;
}
@end
Step 4
Step 5
Run your App
Good Luck!
Tutorial List
- SQLite Based iPhone Application
- json with IOS (Basic) - Tutorial
- Simple Table View in IOS
- Load Distinct Images from array into UITableView
- Simple UIPickerView Example
- Tab Bar Application Part 1
- Tab Bar Application Part 2
- Tab Bar Application Part 3 ( with Login Screen )
- Tab Bar Application Part 4 ( Navigation )
- Table View Design in IOS Part 1
- Table View Design in IOS Part 2 ( Time Table )
- How to Add search bar in Table View
- Local Notification in IOS
- Core Data (For Beginners )
- Core Data Tute 2 (Add/Delete/Search)
- Core Data Tute 3 (Two table)
- Custom Cell in UITableview
- Lazy Loading
- Pull to Refresh in TableView
- Working with keyboard in Objective C - Part 1


welcome....!
ReplyDelete